Login and Registration Form in Asp Net With Database
ASP.NET Core 5 — JWT Authentication Tutorial with Example API
In this tutorial we'll go through a simple example of how to implement custom JWT (JSON Web Token) authentication in an ASP.NET Core 5 API with C#.

JSON Web Token (JWT) is an open standard (RFC 7519) that defines a compact and self-contained way for securely transmitting information between parties as a JSON object. This information can be verified and trusted because it is digitally signed. JWTs can be signed using a secret (with the HMAC algorithm) or a public/private key pair using RSA or ECDSA.
Please refer to below link for more details about JSON Web Tokens.
https://jwt.io/introduction/
Prerequisites
The following must be installed in your system:
- Visual Studio 2019 16.4 or later with the ASP.NET and web development workload
- .NET Core 5
- Secrete Key from JWT. Create Key from "https://auth0.com/developers".
Step 1 New Project
Once you have installed the Visual Studio 2019 and .Net Core 5 SDK, you can start building a new ASP.NET Core API.
- Open VS2019
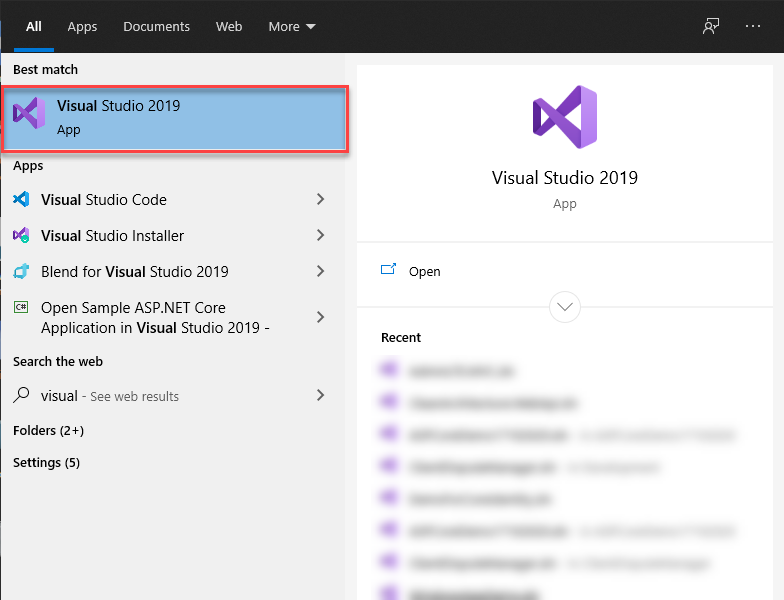
- On the start page, choose Create a new project.
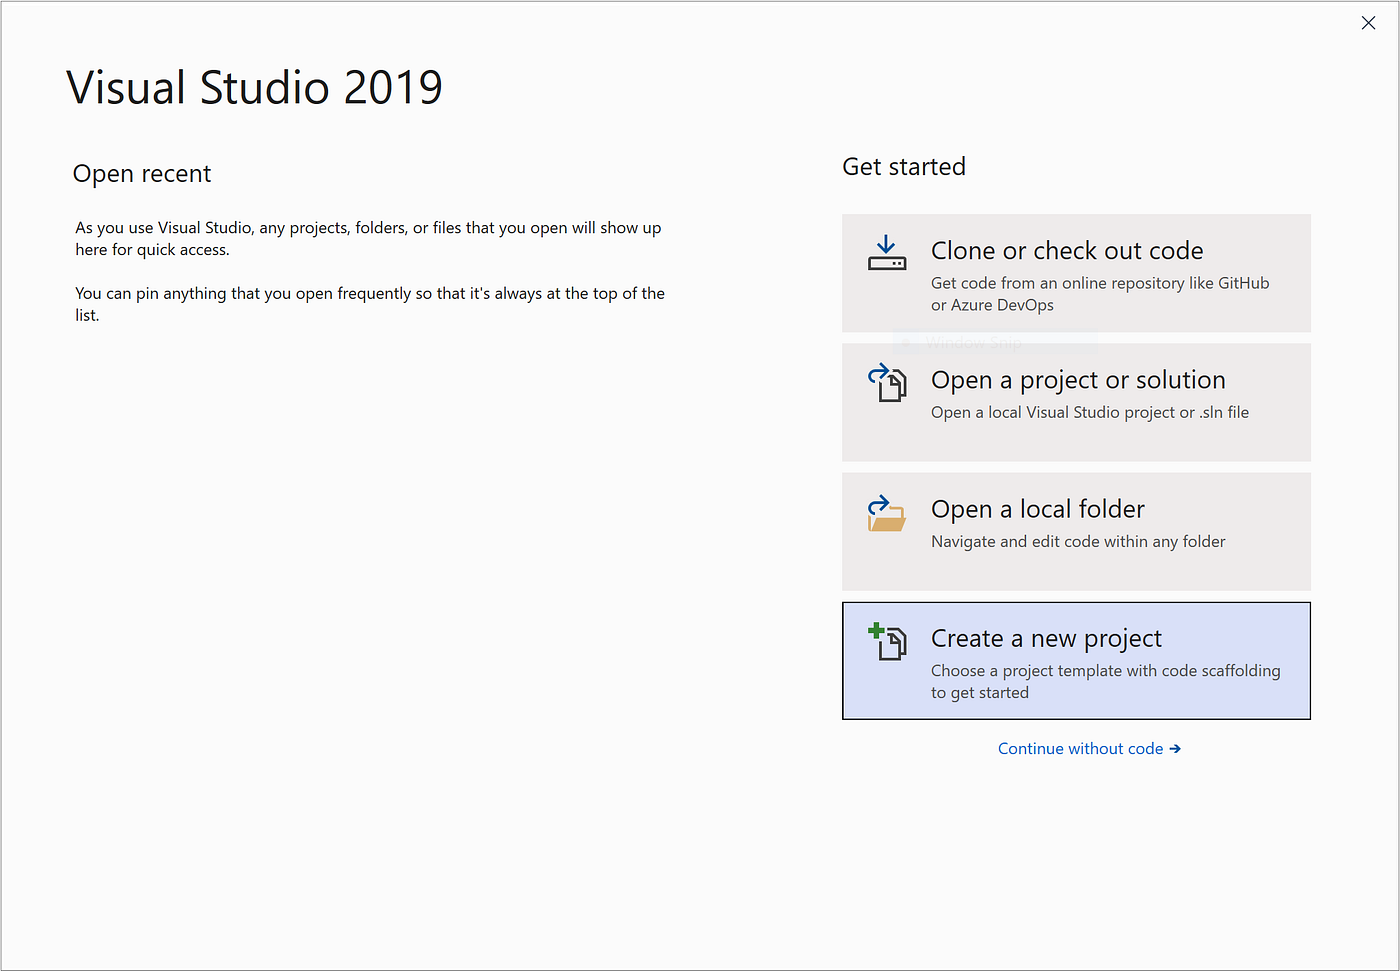
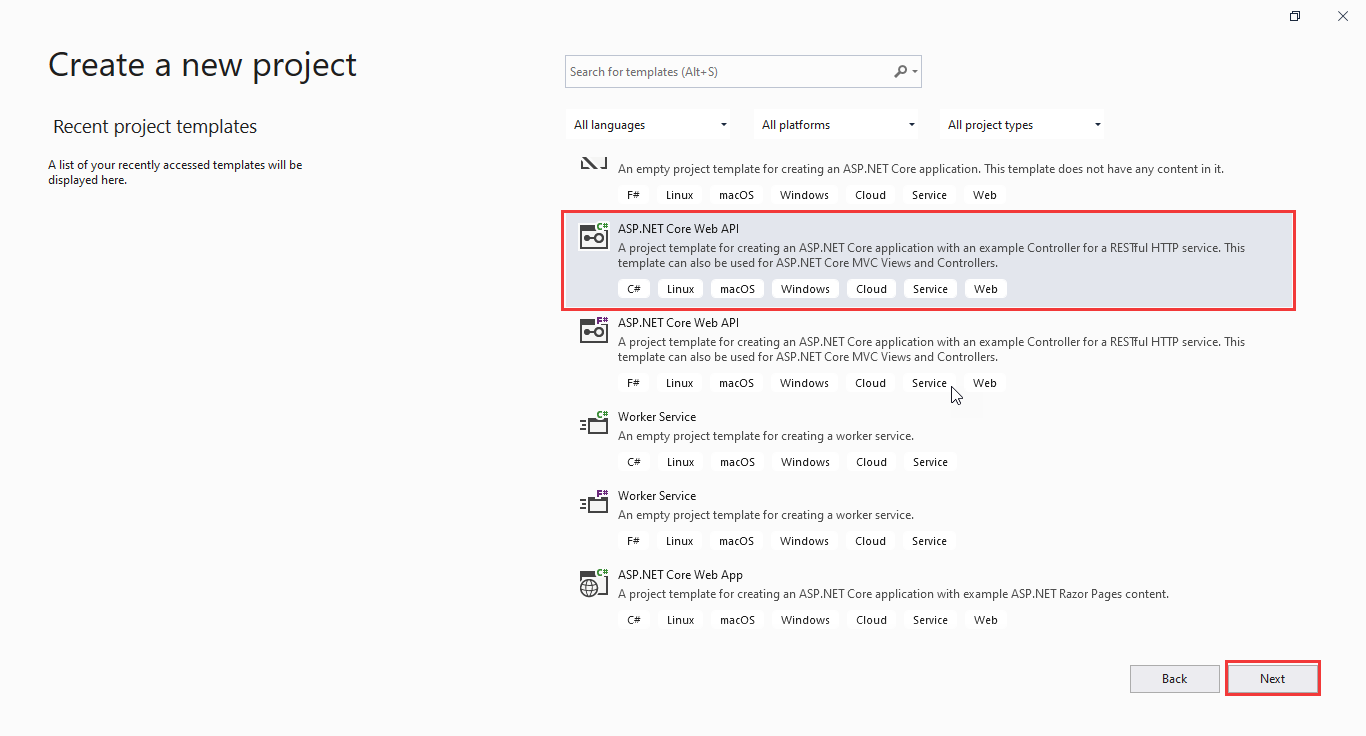
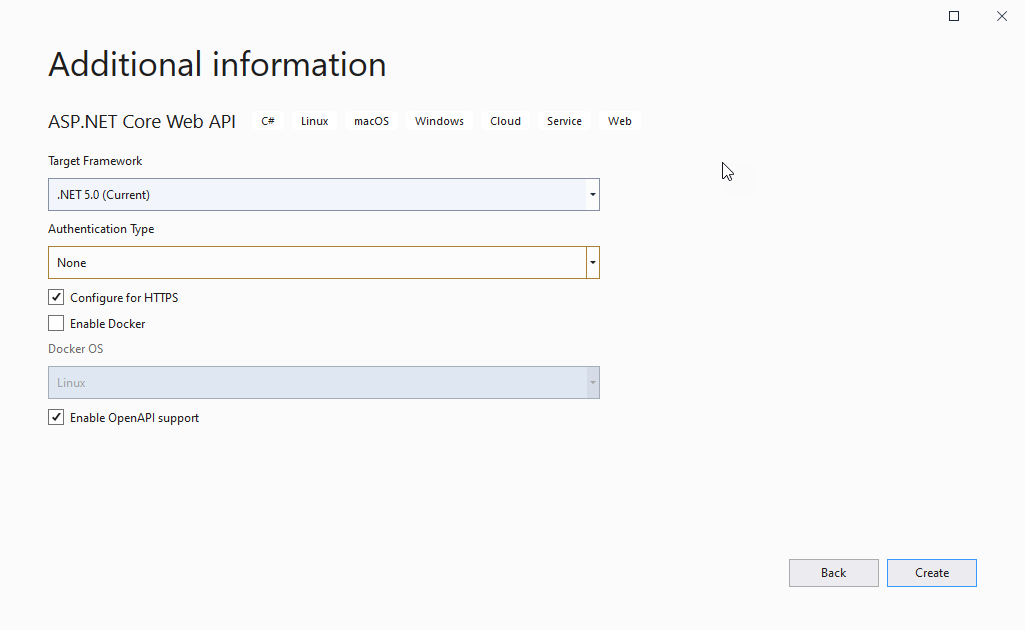
- Create a web app and From the Visual Studio select Create a new project. Select ASP.NET Core Web API > Next.
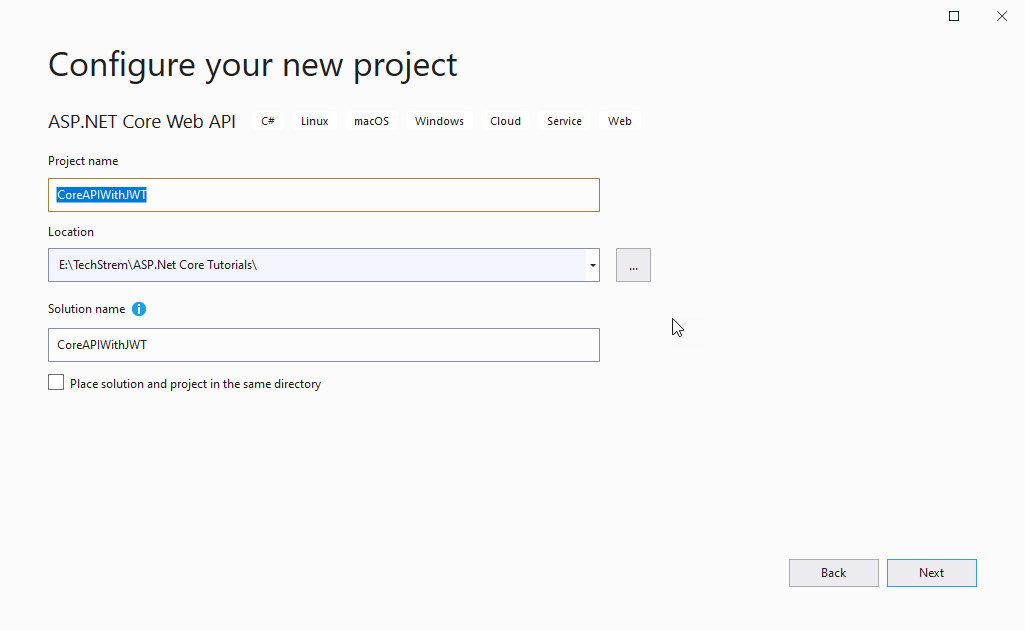
- Give your project a name i.e. CoreAPIWithJWT and give your project a location where it'll be saved and click Create.
Step 2: Install the NuGet Packages
We will install some of the required Entity Framework Core and JWT packages from the NuGet Package Manager for performing database operations from the code.
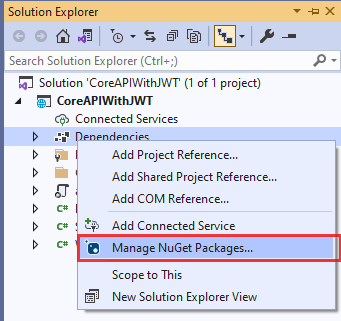
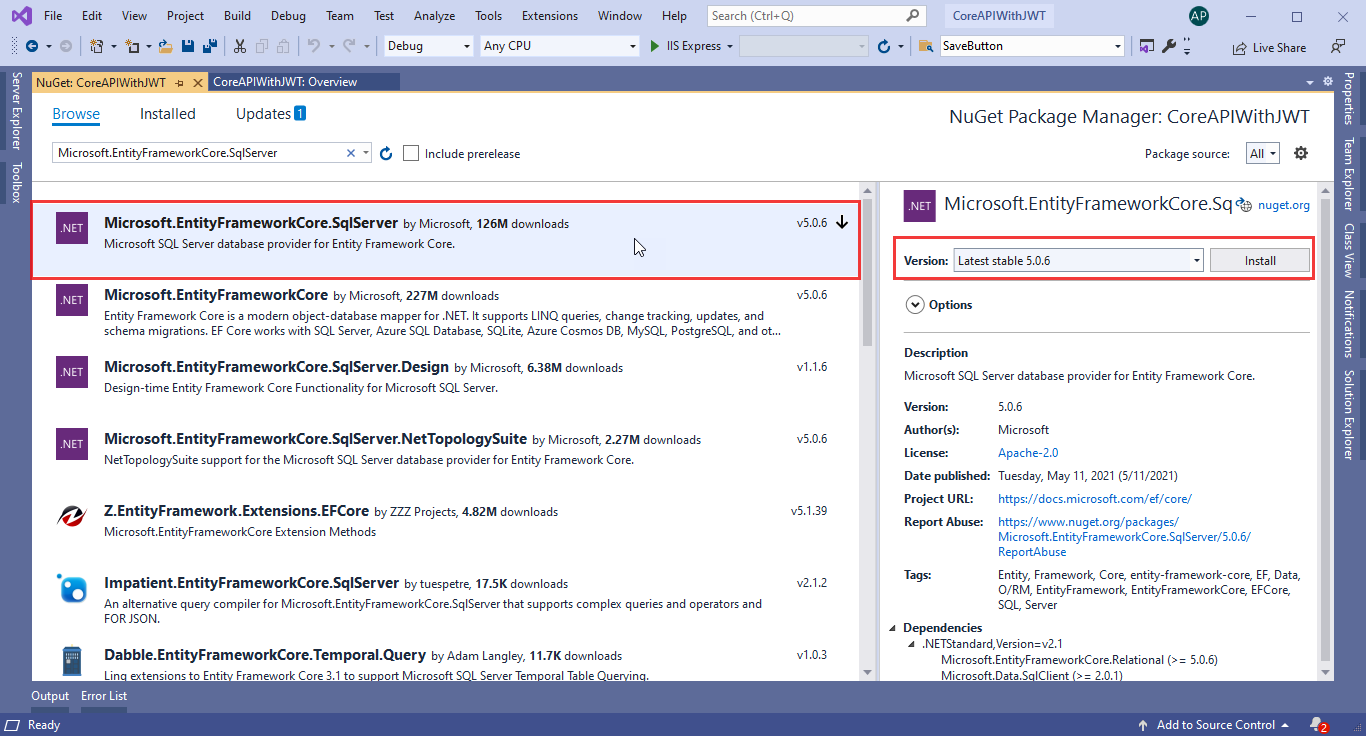
- From the Solution right click on dependency, select Manage NuGet Packages and Select the Browse tab, and then enter Microsoft.EntityFrameworkCore.SqlServer in the search box, select Latest Stable Version and Install.
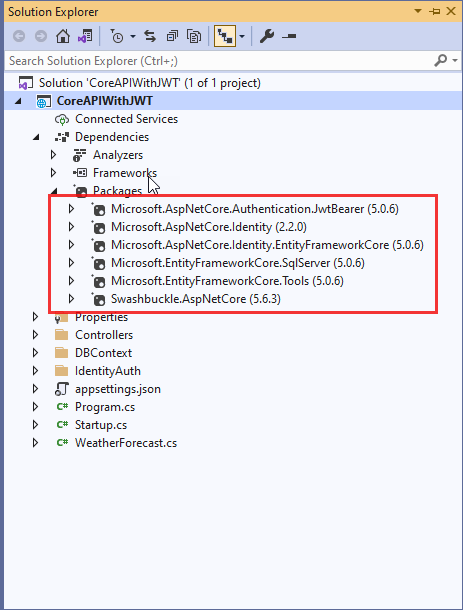
Now, install Microsoft.EntityFrameworkCore.Tools, Microsoft.AspNetCore.Identity.EntityFrameworkCore, Microsoft.AspNetCore.Identity and Microsoft.AspNetCore.Authentication.JwtBearer, as same as above steps.
Step 3: Context Classes and Create Database using Migration:
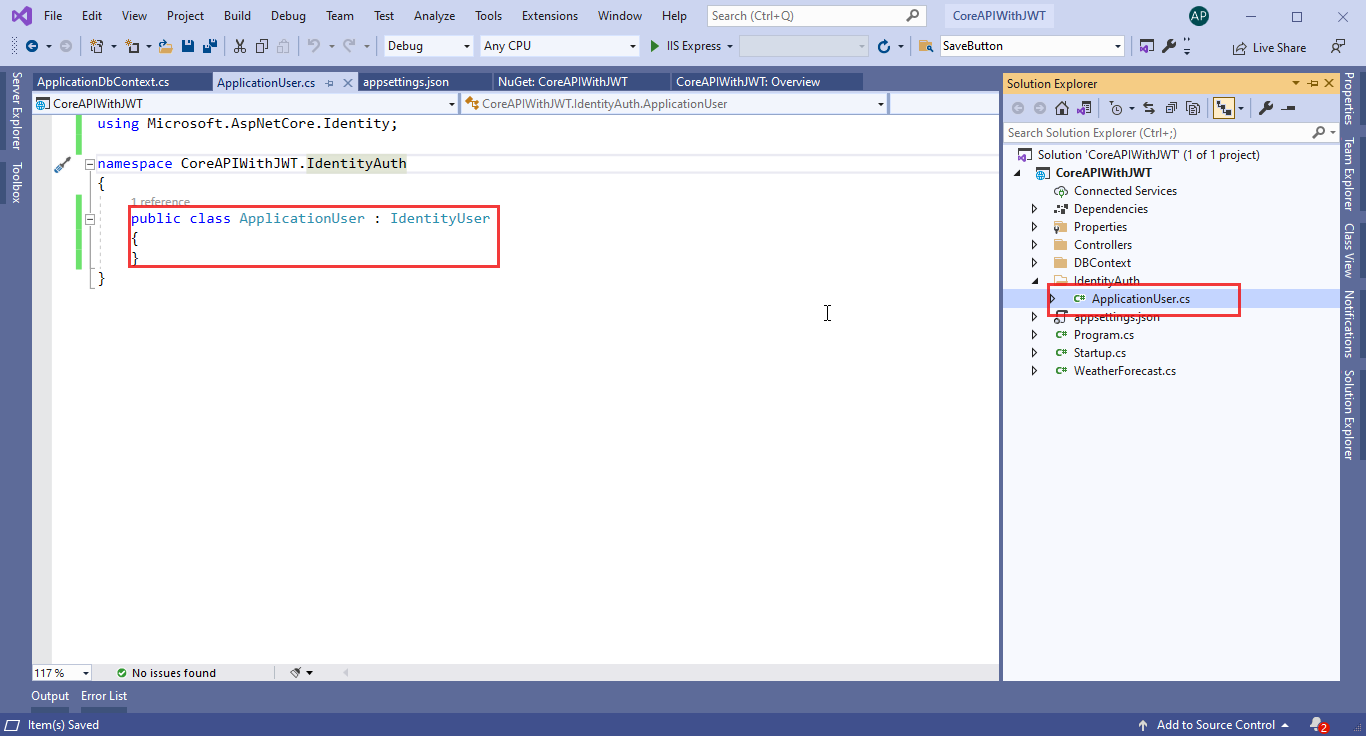
Now, Add new folder "IdentityAuth" and add new class with name "ApplicationUser", using Right-click the IdentityAuth folder and select Add Class. Replace code with following code.
Now it is ready for add database context:
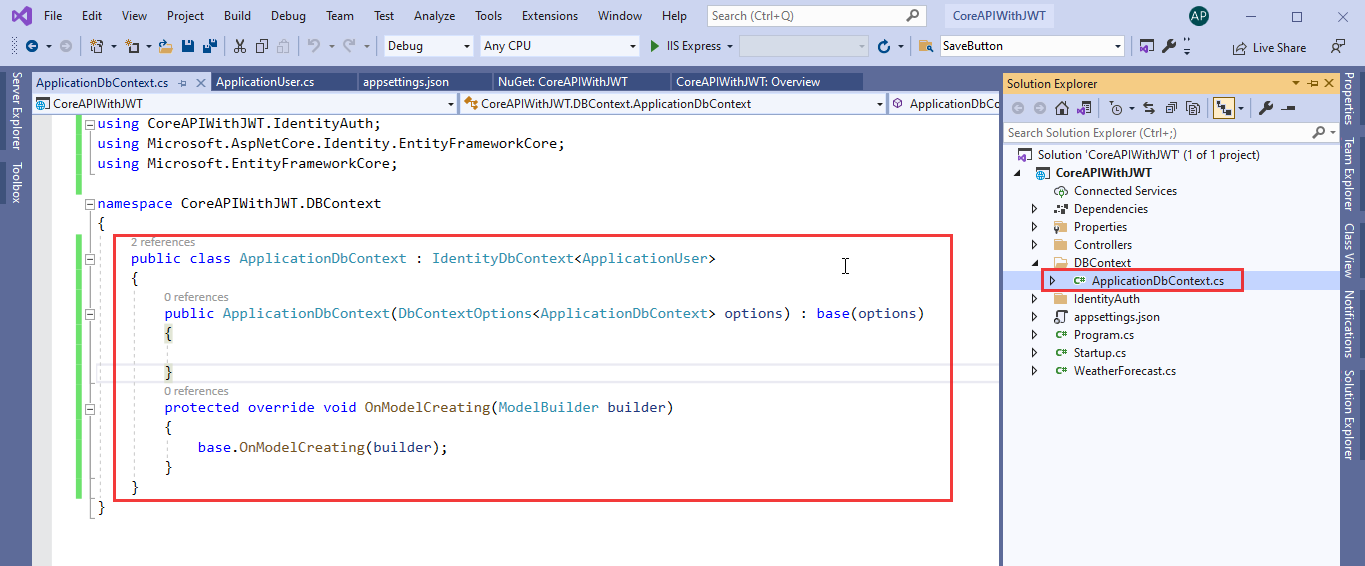
- Right-click the DBContext folder and select Add > Class. Name the class ApplicationDbContext and click Add and change code in ApplicationDbContext.cs as following:
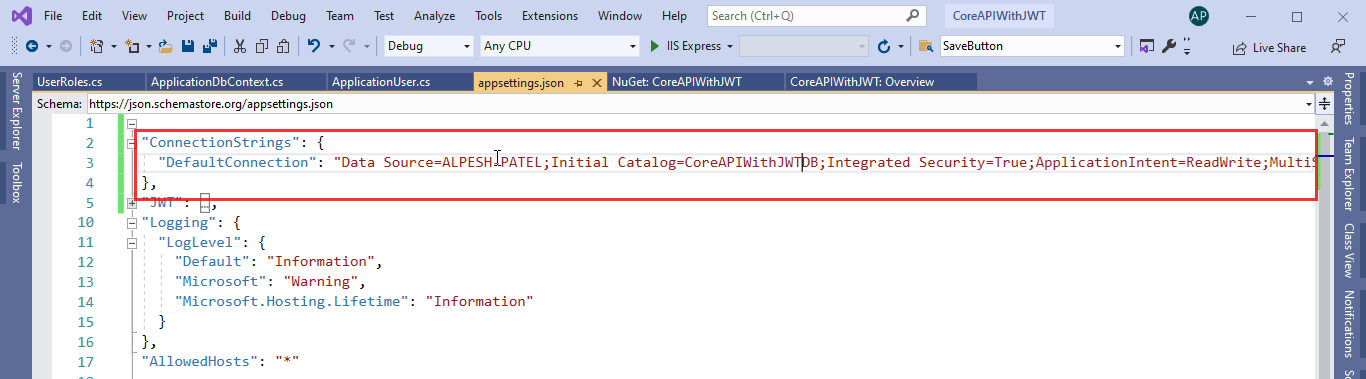
- Connection string you need to write inside the appsetting.json file as follows:
"DefaultConnection": "Data Source=Localhost;Initial Catalog=CoreAPIWithJWTDB;Integrated Security=True;ApplicationIntent=ReadWrite;MultiSubnetFailover=False"
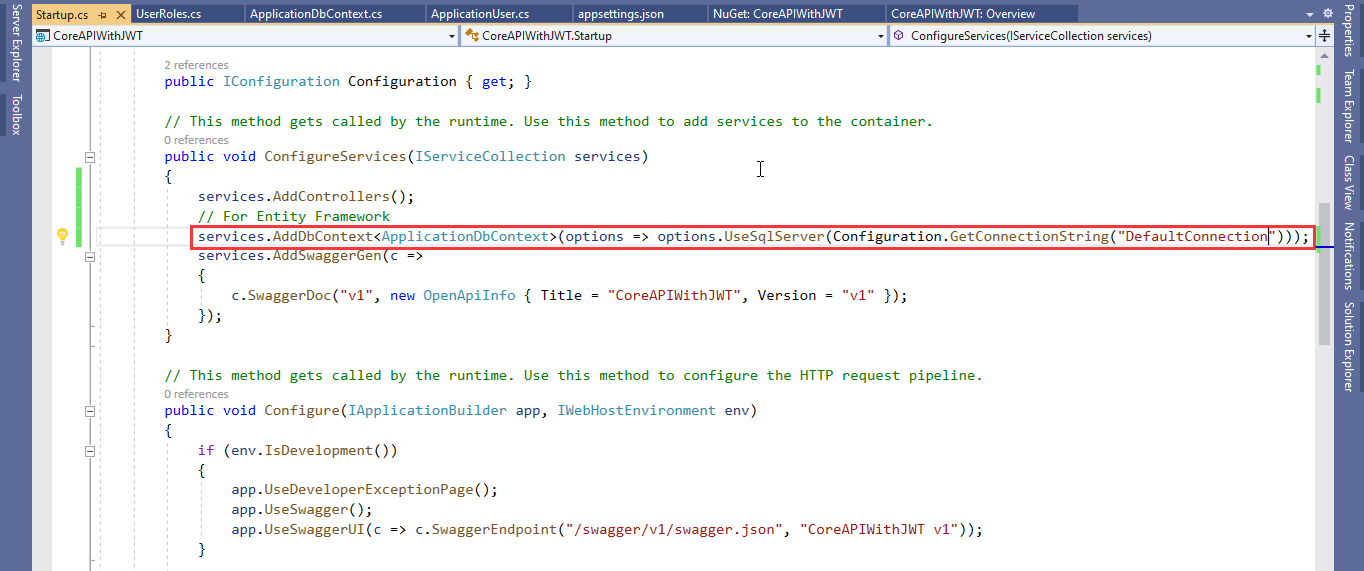
- In ASP.NET Core, services such as the DB context must be registered with the dependency injection container. The container provides the service to controllers.
- Update Startup.cs with the following highlighted code:
services.AddDbContext<ApplicationDbContext>(options => options.UseSqlServer(Configuration.GetConnectionString("DefaultConnection")));
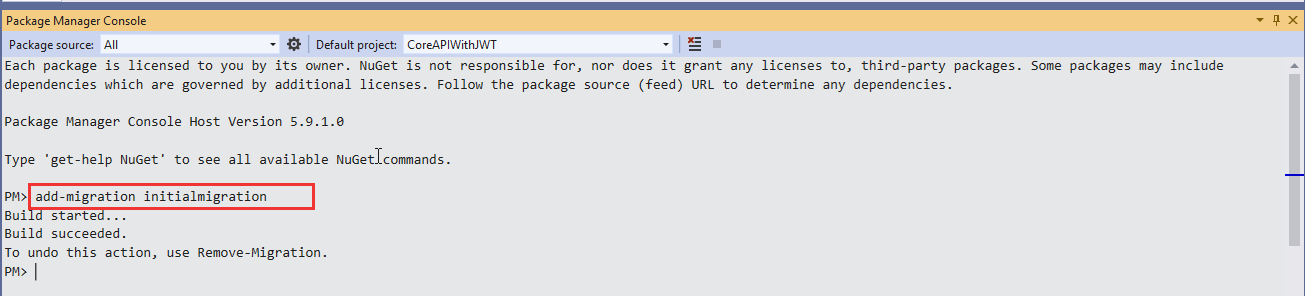
Open Package Manager Console from the Tools Menu and select the Default project for which you would like to generate migrations code. For this demonstration, we have only a single project as CoreAPIWithJWT. Therefore, by default, it is a default project.
- For creating the migration code, we use 'add-migration MigrationName' command. So, let's perform this operation and see what happens. Therefore, in the Package Manager Console, just type 'add-migration initialmigration' command and press Enter.
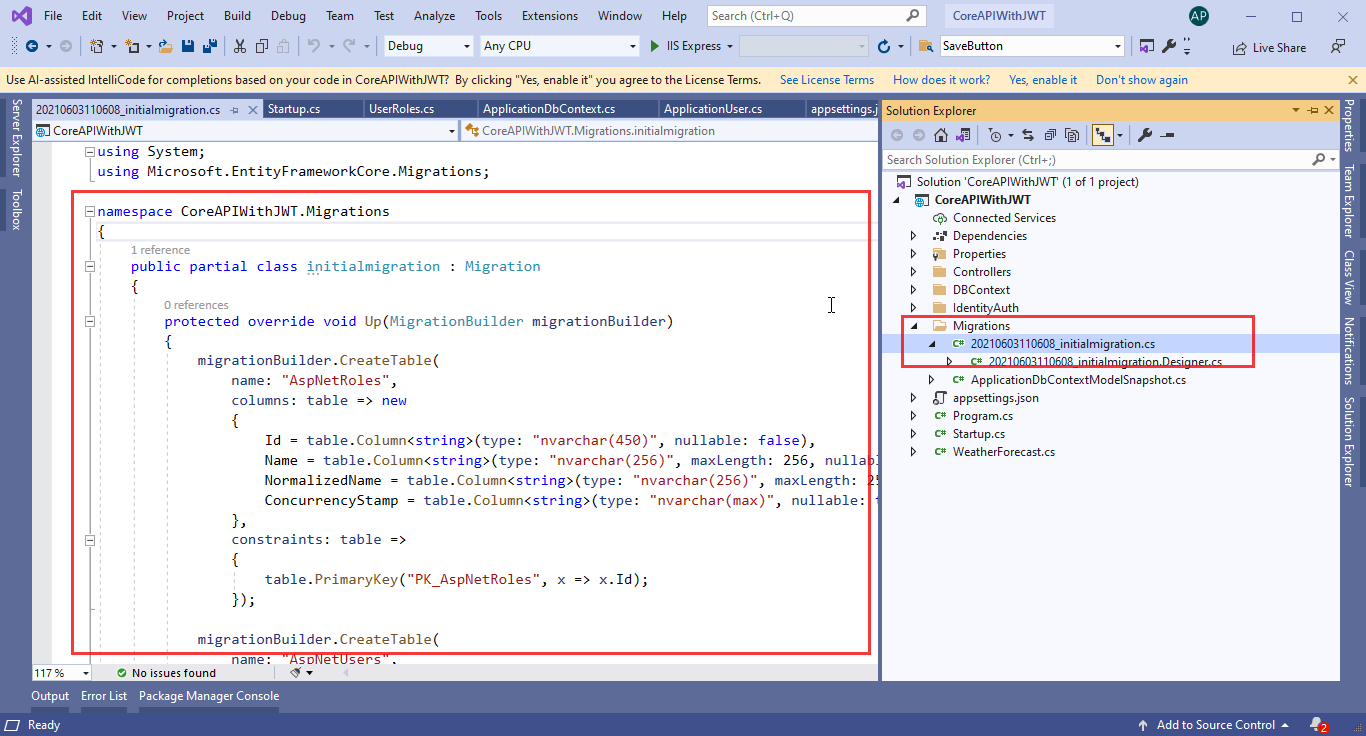
- After the add migration command executes successfully, it creates a folder name as 'Migration' in the project and creates the class with the same name [MigrationName] as we have provided while executing add migration command with some name. Here you can see the table structure based on your Model, which is ready to generate the database.
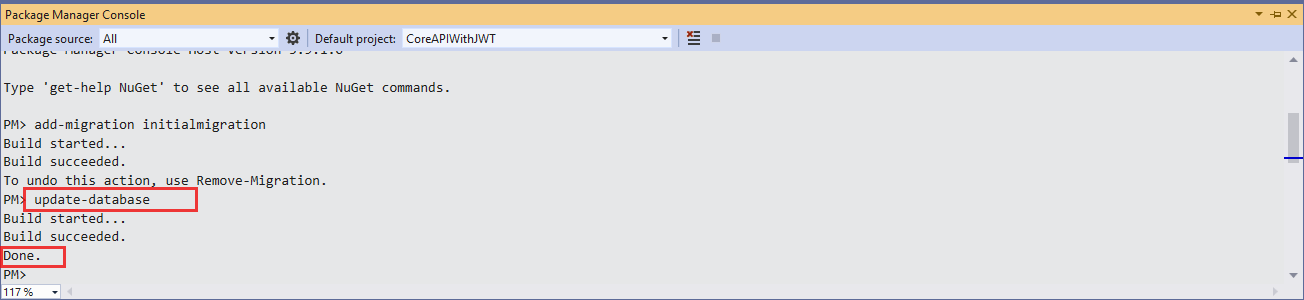
- We have only created the migration script which is responsible for creating the database and its table. But we've not created the actual database and tables. So, let's execute the migration script and generate the database and tables. Therefore, executing the migration scripts we have to execute 'update-database' command.
- After the add update-database command executes successfully, you will received message for "Done" and you can see you database also created on SQL server.
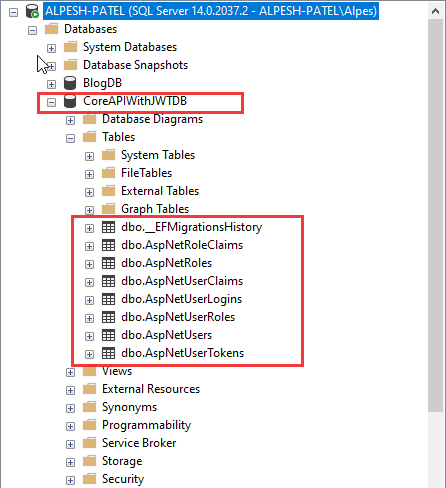
- We just need to go to SQL Server Management Studio and login and see the Database. You will find the database, table and Entity Framework Migration history table as follows.
Step 4: Authentication Using JWT:
Create one models class and add following models on it.
- Create class "RegisterModel" for new user registration.
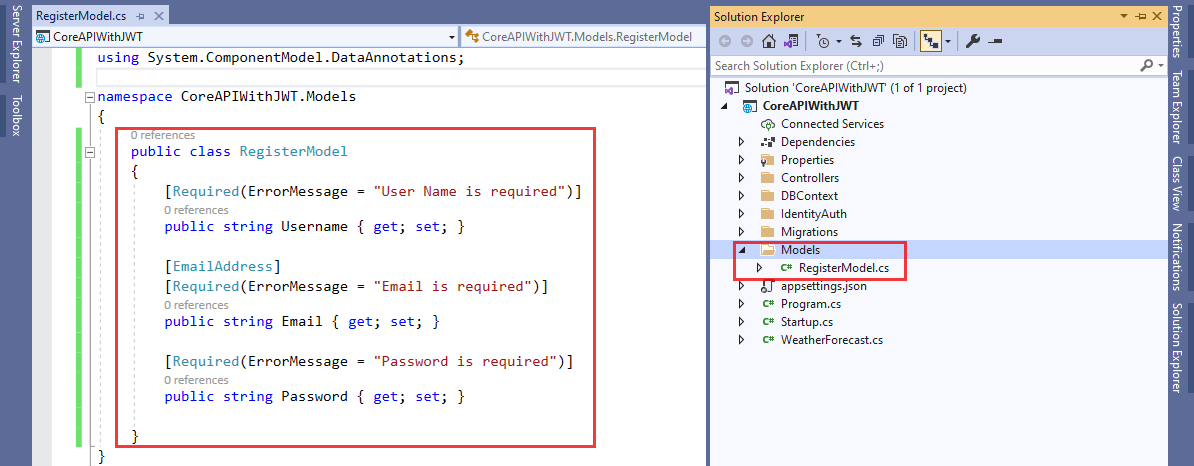
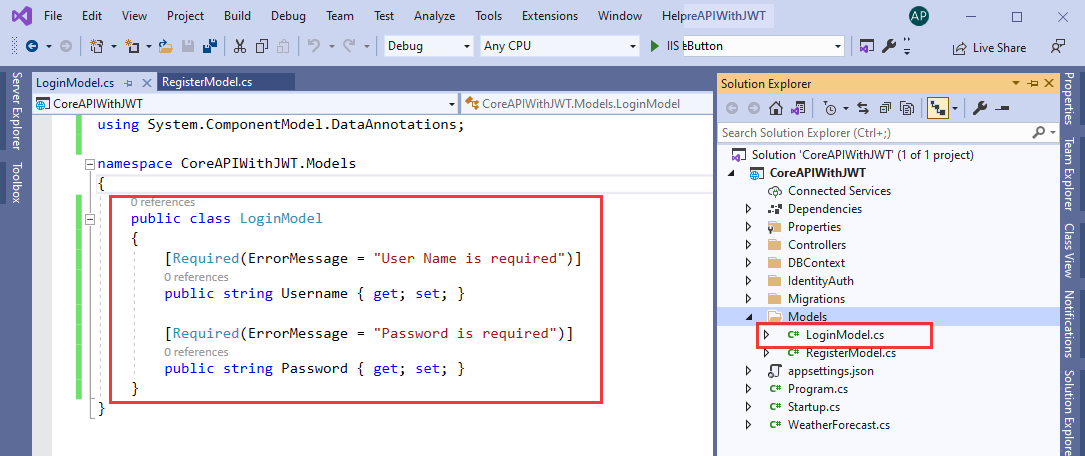
- Create one more class "LoginModel" for user login in same models folder.
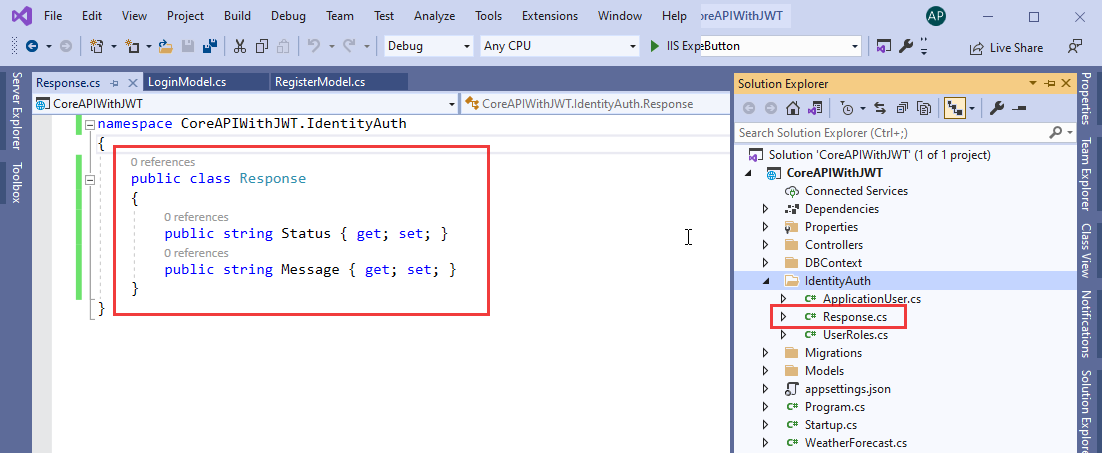
- We can create a class "Response" for returning the response value after user registration and user login. It will also return error messages, if the request fails.
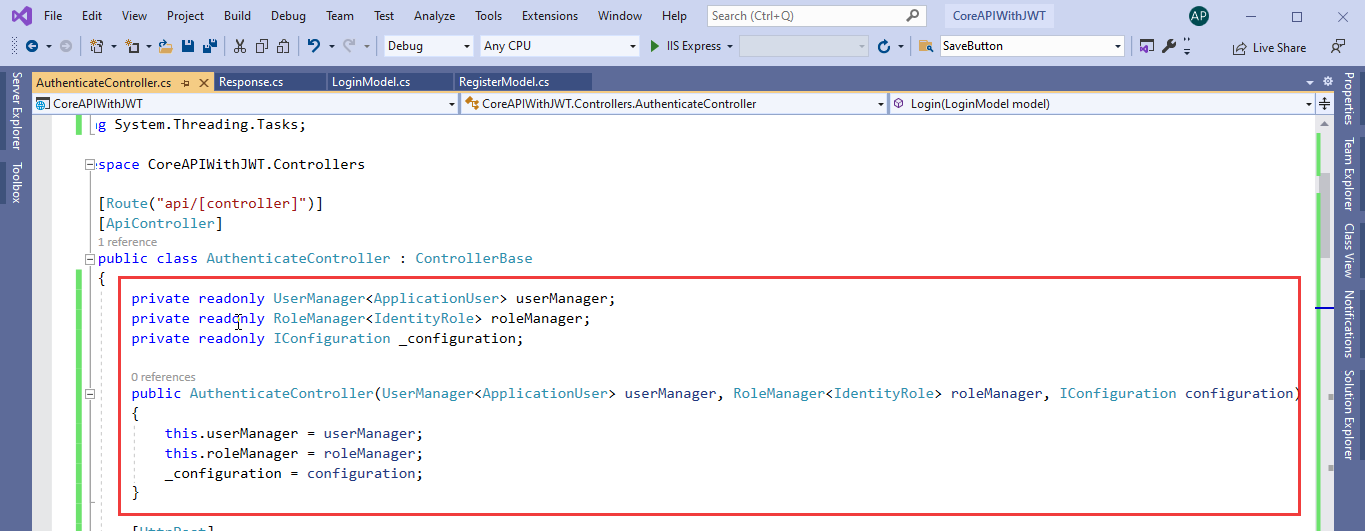
Now, We create an API controller "AuthenticateController" inside the "Controllers" folder.

Add constructor in AuthenticateController as below:
private readonly UserManager<ApplicationUser> userManager;
private readonly RoleManager<IdentityRole> roleManager;
private readonly IConfiguration _configuration;public AuthenticateController(UserManager<ApplicationUser> userManager, RoleManager<IdentityRole> roleManager, IConfiguration configuration)
{
this.userManager = userManager;
this.roleManager = roleManager;
_configuration = configuration;
}
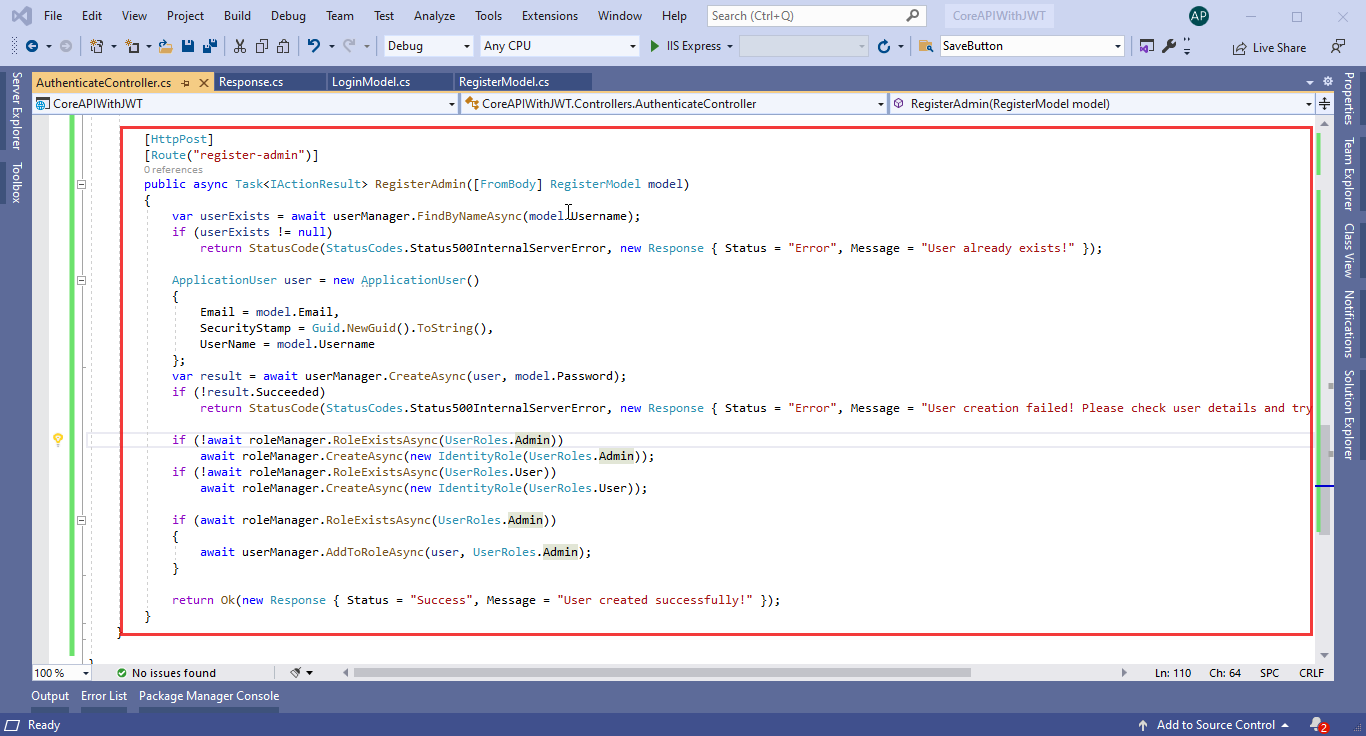
We add two methods in AuthenticateController for Admin Register and User Register as below.
[HttpPost]
[Route("register")]
public async Task<IActionResult> Register([FromBody] RegisterModel model)
{
var userExists = await userManager.FindByNameAsync(model.Username);
if (userExists != null)
return StatusCode(StatusCodes.Status500InternalServerError, new Response { Status = "Error", Message = "User already exists!" });ApplicationUser user = new ApplicationUser()
{
Email = model.Email,
SecurityStamp = Guid.NewGuid().ToString(),
UserName = model.Username
};
var result = await userManager.CreateAsync(user, model.Password);
if (!result.Succeeded)
return StatusCode(StatusCodes.Status500InternalServerError, new Response { Status = "Error", Message = "User creation failed! Please check user details and try again." });return Ok(new Response { Status = "Success", Message = "User created successfully!" });
}

[HttpPost]
[Route("register-admin")]
public async Task<IActionResult> RegisterAdmin([FromBody] RegisterModel model)
{
var userExists = await userManager.FindByNameAsync(model.Username);
if (userExists != null)
return StatusCode(StatusCodes.Status500InternalServerError, new Response { Status = "Error", Message = "User already exists!" });ApplicationUser user = new ApplicationUser()
{
Email = model.Email,
SecurityStamp = Guid.NewGuid().ToString(),
UserName = model.Username
};
var result = await userManager.CreateAsync(user, model.Password);
if (!result.Succeeded)
return StatusCode(StatusCodes.Status500InternalServerError, new Response { Status = "Error", Message = "User creation failed! Please check user details and try again." });if (!await roleManager.RoleExistsAsync(UserRoles.Admin))
await roleManager.CreateAsync(new IdentityRole(UserRoles.Admin));
if (!await roleManager.RoleExistsAsync(UserRoles.User))
await roleManager.CreateAsync(new IdentityRole(UserRoles.User));if (await roleManager.RoleExistsAsync(UserRoles.Admin))
{
await userManager.AddToRoleAsync(user, UserRoles.Admin);
}return Ok(new Response { Status = "Success", Message = "User created successfully!" });
}
We add one more methods in AuthenticateController for Login as below.
[HttpPost]
[Route("login")]
public async Task<IActionResult> Login([FromBody] LoginModel model)
{
var user = await userManager.FindByNameAsync(model.Username);
if (user != null && await userManager.CheckPasswordAsync(user, model.Password))
{
var userRoles = await userManager.GetRolesAsync(user);var authClaims = new List<Claim>
{
new Claim(ClaimTypes.Name, user.UserName),
new Claim(JwtRegisteredClaimNames.Jti, Guid.NewGuid().ToString()),
};foreach (var userRole in userRoles)
{
authClaims.Add(new Claim(ClaimTypes.Role, userRole));
}var authSigningKey = new SymmetricSecurityKey(Encoding.UTF8.GetBytes(_configuration["JWT:SecretKey"]));
var token = new JwtSecurityToken(
issuer: _configuration["JWT:ValidIssuer"],
audience: _configuration["JWT:ValidAudience"],
expires: DateTime.Now.AddHours(3),
claims: authClaims,
signingCredentials: new SigningCredentials(authSigningKey, SecurityAlgorithms.HmacSha256)
);return Ok(new
{
token = new JwtSecurityTokenHandler().WriteToken(token),
expiration = token.ValidTo
});
}
return Unauthorized();
}
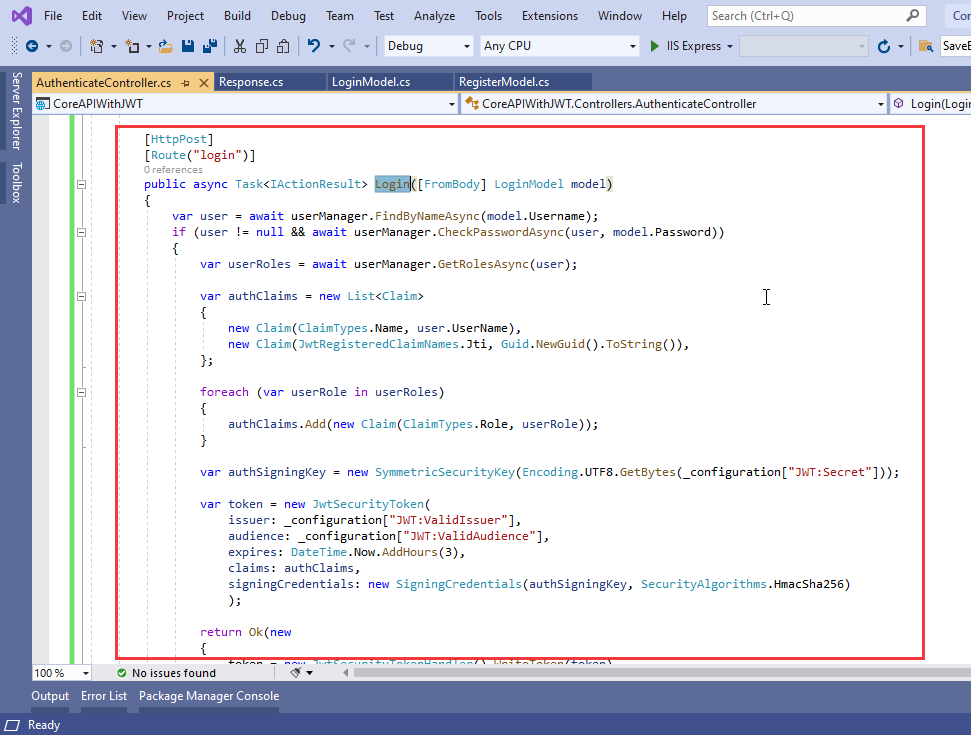
We have added three methods "login", "register", and "register-admin" inside the controller class. Register and register-admin are almost same but the register-admin method will be used to create a user with admin role. In login method, we have returned a JWT token after successful login.
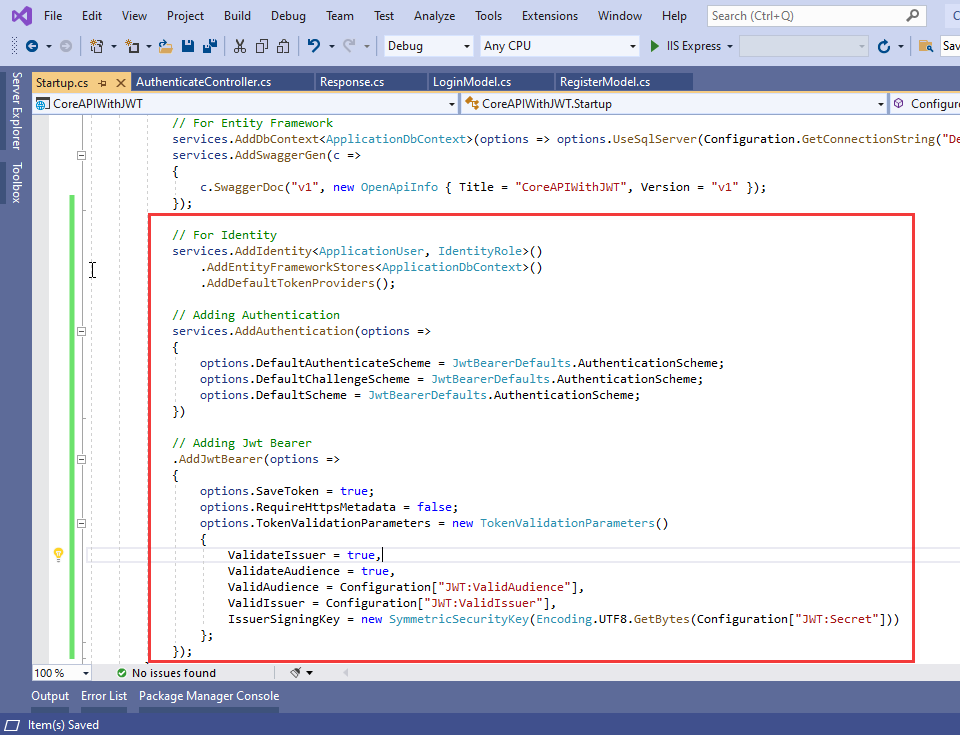
We can make below changes in "ConfigureServices" and "Configure" methods in "Startup" class as well.
// For Identity
services.AddIdentity<ApplicationUser, IdentityRole>()
.AddEntityFrameworkStores<ApplicationDbContext>()
.AddDefaultTokenProviders();// Adding Authentication
services.AddAuthentication(options =>
{
options.DefaultAuthenticateScheme = JwtBearerDefaults.AuthenticationScheme;
options.DefaultChallengeScheme = JwtBearerDefaults.AuthenticationScheme;
options.DefaultScheme = JwtBearerDefaults.AuthenticationScheme;
})// Adding Jwt Bearer
.AddJwtBearer(options =>
{
options.SaveToken = true;
options.RequireHttpsMetadata = false;
options.TokenValidationParameters = new TokenValidationParameters()
{
ValidateIssuer = true,
ValidateAudience = true,
ValidAudience = Configuration["JWT:ValidAudience"],
ValidIssuer = Configuration["JWT:ValidIssuer"],
IssuerSigningKey = new SymmetricSecurityKey(Encoding.UTF8.GetBytes(Configuration["JWT:SecretKey"]))
};
});
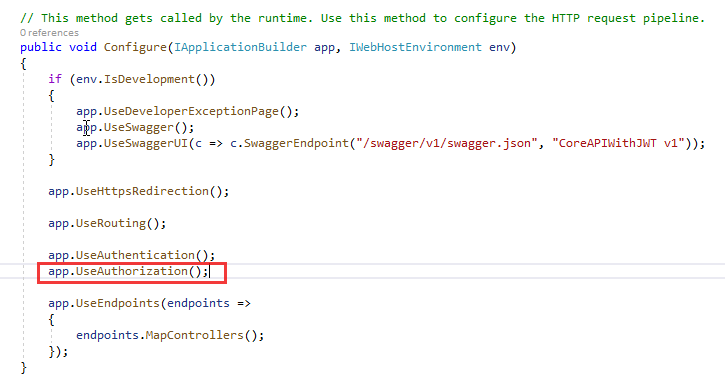
Add "app.UseAuthorization()" in Startup Configure as below.
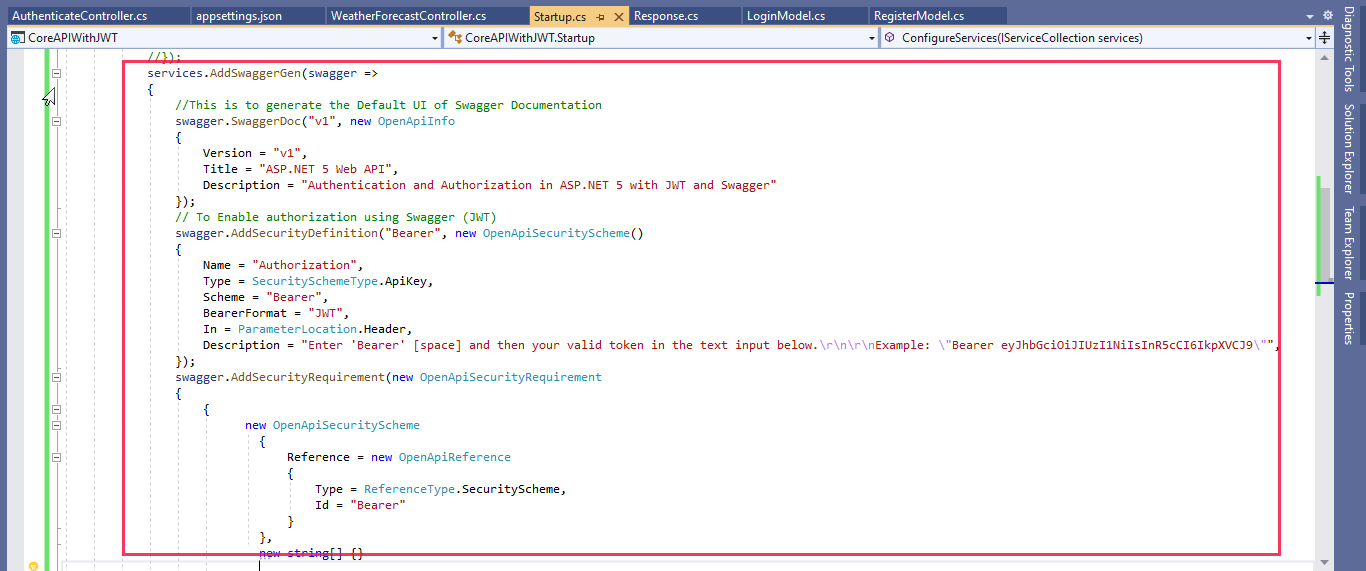
- You need to change swagger configuration in startup for authentication as below:
services.AddSwaggerGen(swagger =>
{
//This is to generate the Default UI of Swagger Documentation
swagger.SwaggerDoc("v1", new OpenApiInfo
{
Version = "v1",
Title = "ASP.NET 5 Web API",
Description = "Authentication and Authorization in ASP.NET 5 with JWT and Swagger"
});
// To Enable authorization using Swagger (JWT)
swagger.AddSecurityDefinition("Bearer", new OpenApiSecurityScheme()
{
Name = "Authorization",
Type = SecuritySchemeType.ApiKey,
Scheme = "Bearer",
BearerFormat = "JWT",
In = ParameterLocation.Header,
Description = "Enter 'Bearer' [space] and then your valid token in the text input below.\r\n\r\nExample: \"Bearer eyJhbGciOiJIUzI1NiIsInR5cCI6IkpXVCJ9\"",
});
swagger.AddSecurityRequirement(new OpenApiSecurityRequirement
{
{
new OpenApiSecurityScheme
{
Reference = new OpenApiReference
{
Type = ReferenceType.SecurityScheme,
Id = "Bearer"
}
},
new string[] {}}
});
});
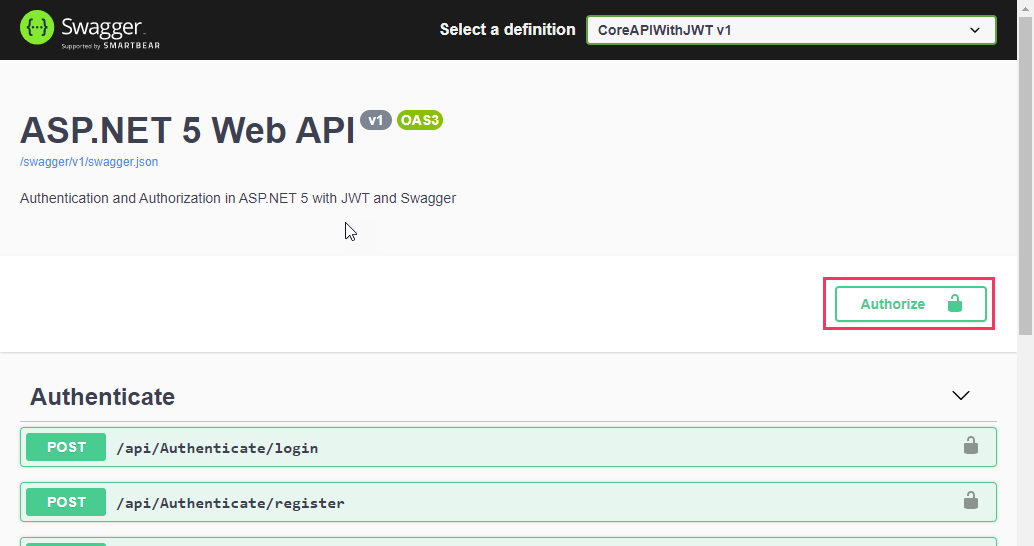
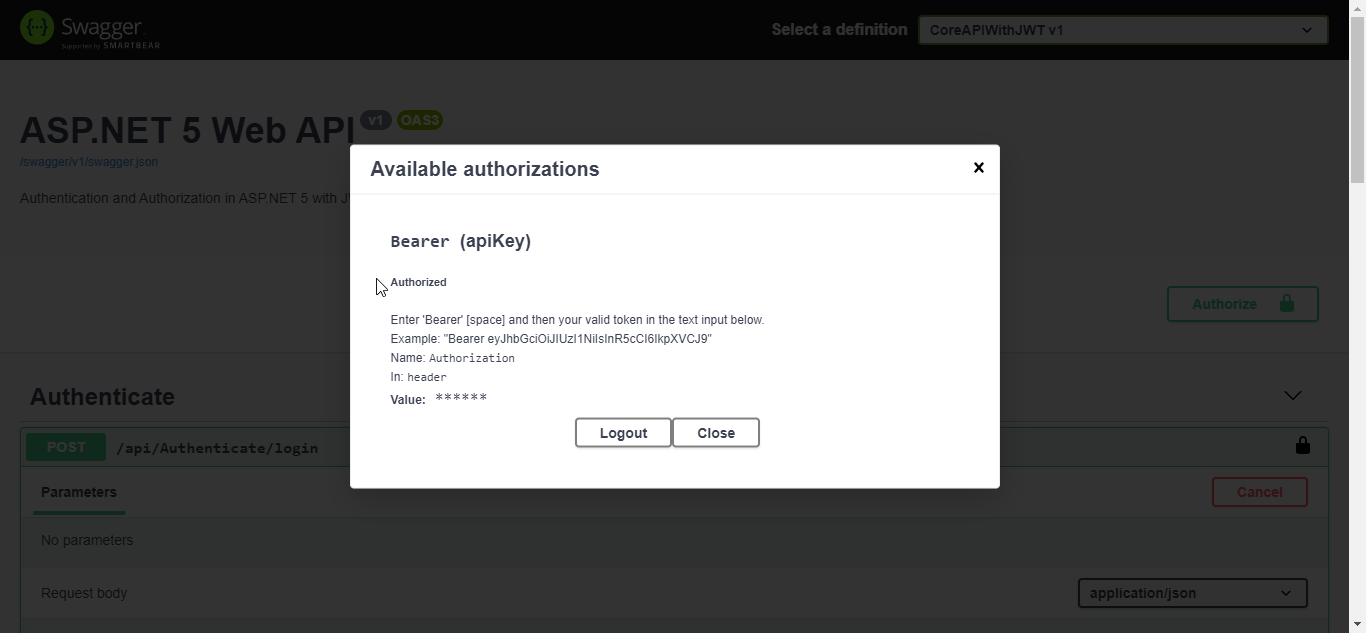
After this swagger configuration when you run then you can see Authorize button on Swagger.
We add "Authorize" attribute inside the "WeatherForecast" controller.

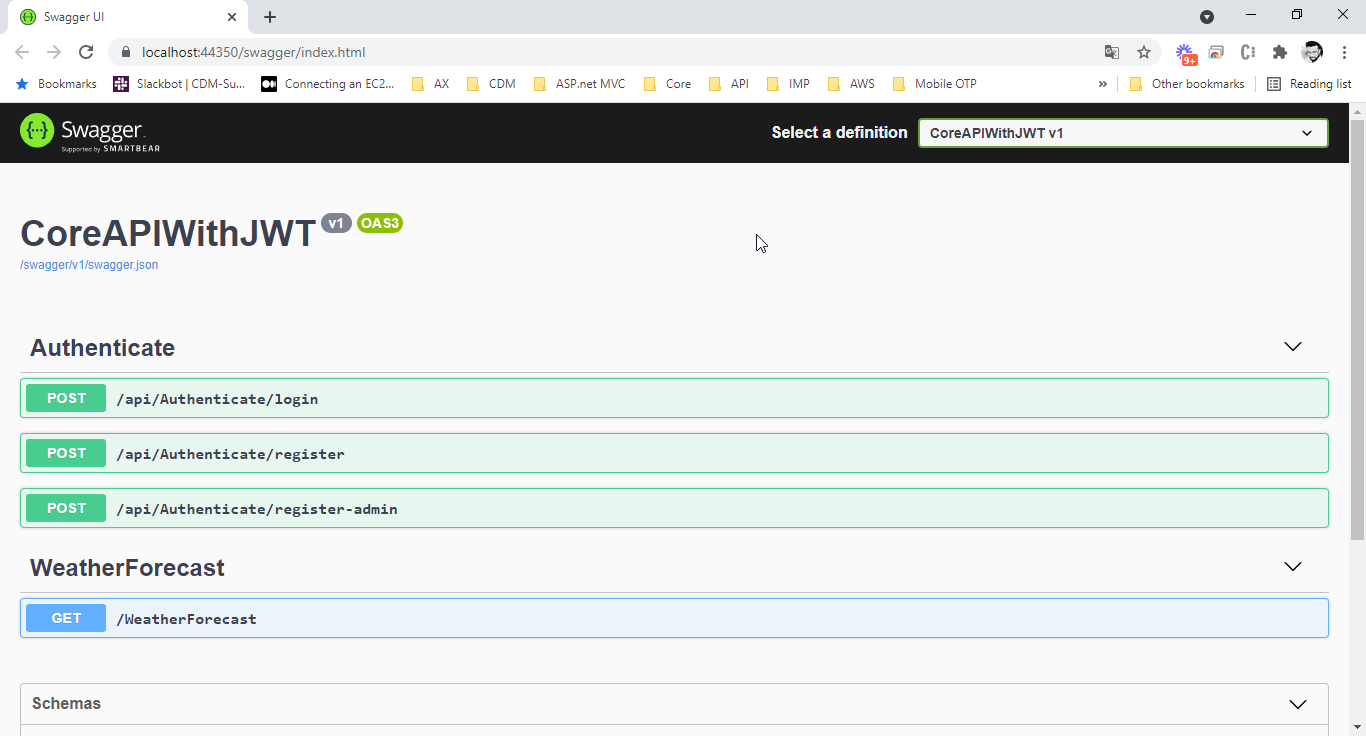
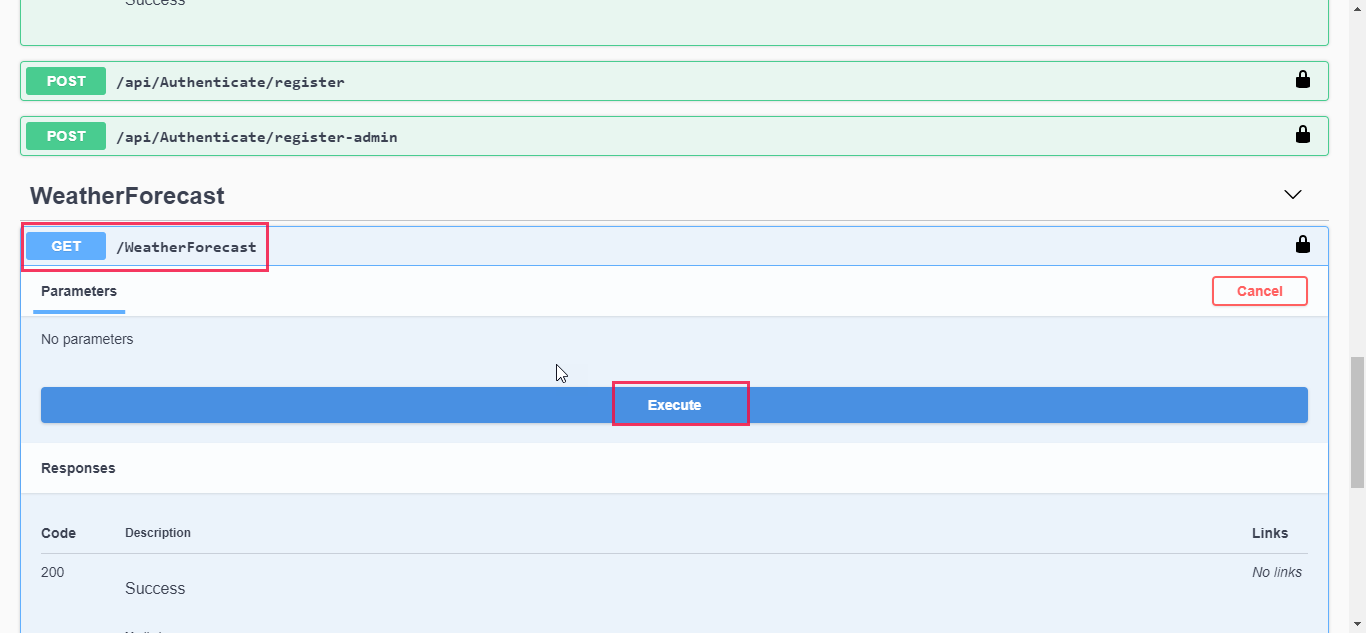
Now Let's Run Project and after run it will look like this in swagger:
When try to access get method in weatherforecast controller then you will receive Unauthorize.

- We have received a 401 unauthorized error. Because, we have added Authorize attribute to entire controller. We must provide a valid token via request header to access this controller and methods inside the controller.
- We create a new user using register method in authenticate controller.
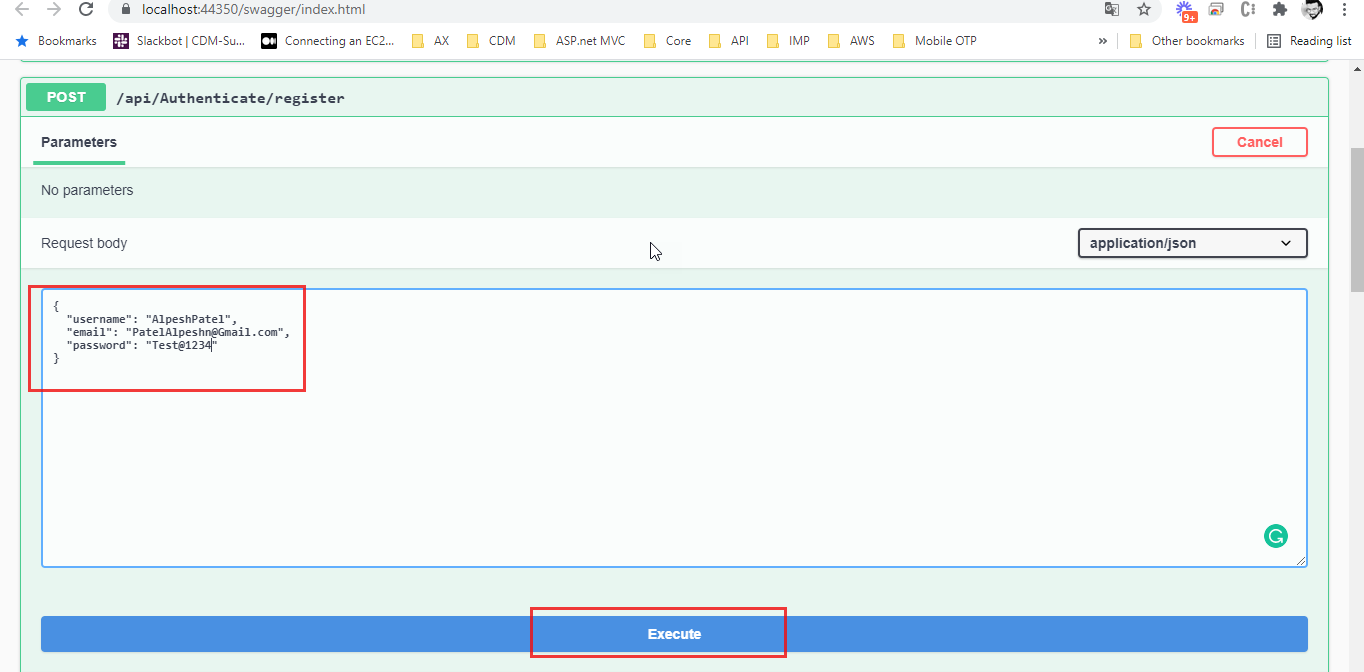
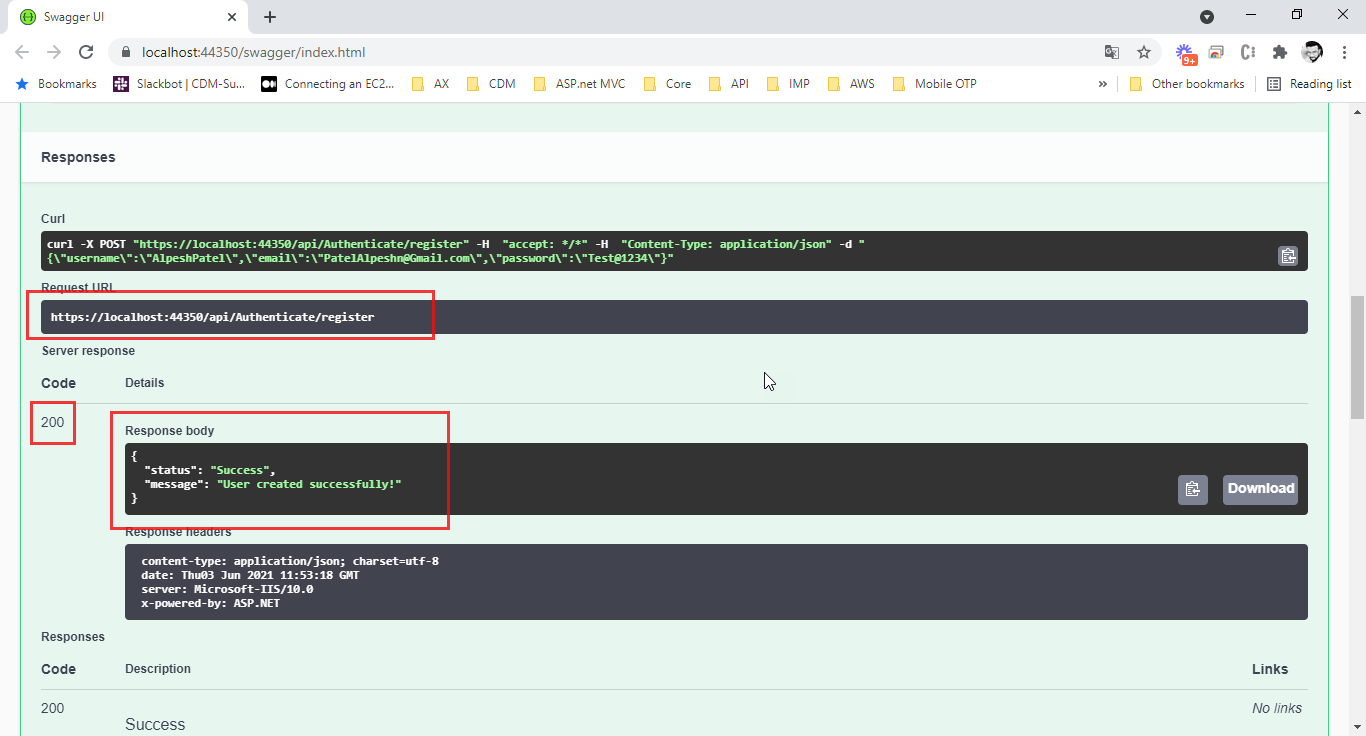
We use above user credentials to login and get a valid JWT token.
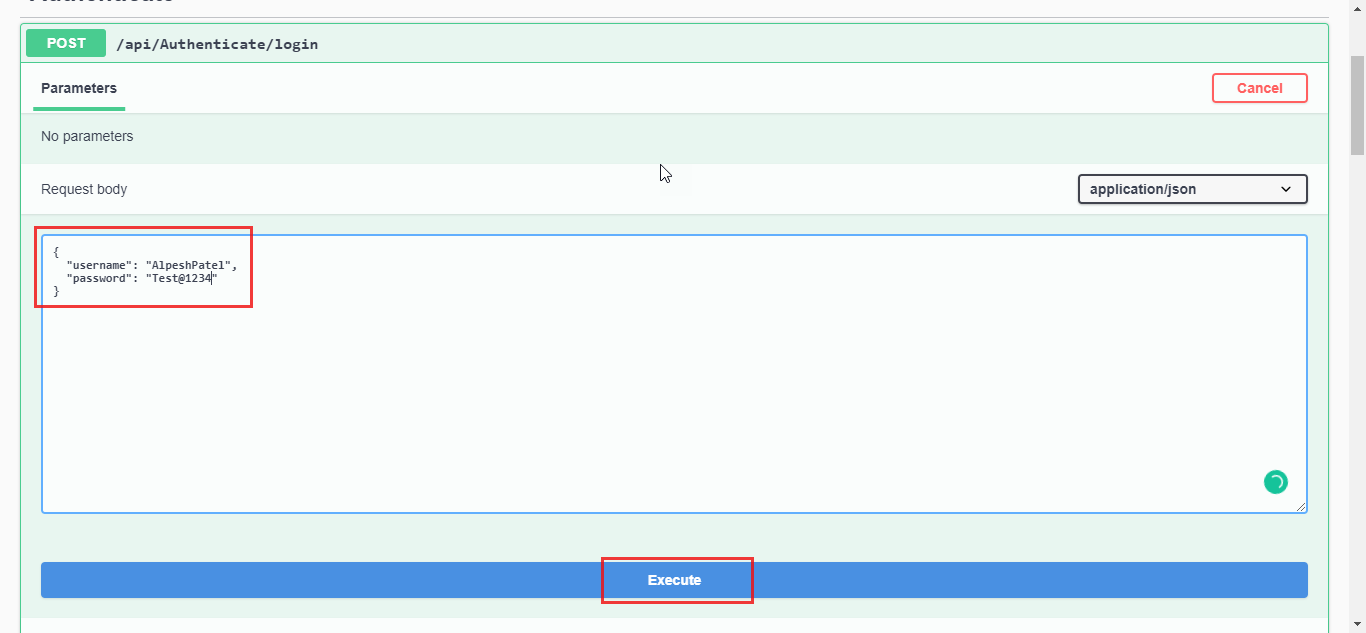

We have received a token after successful login with above credentials.
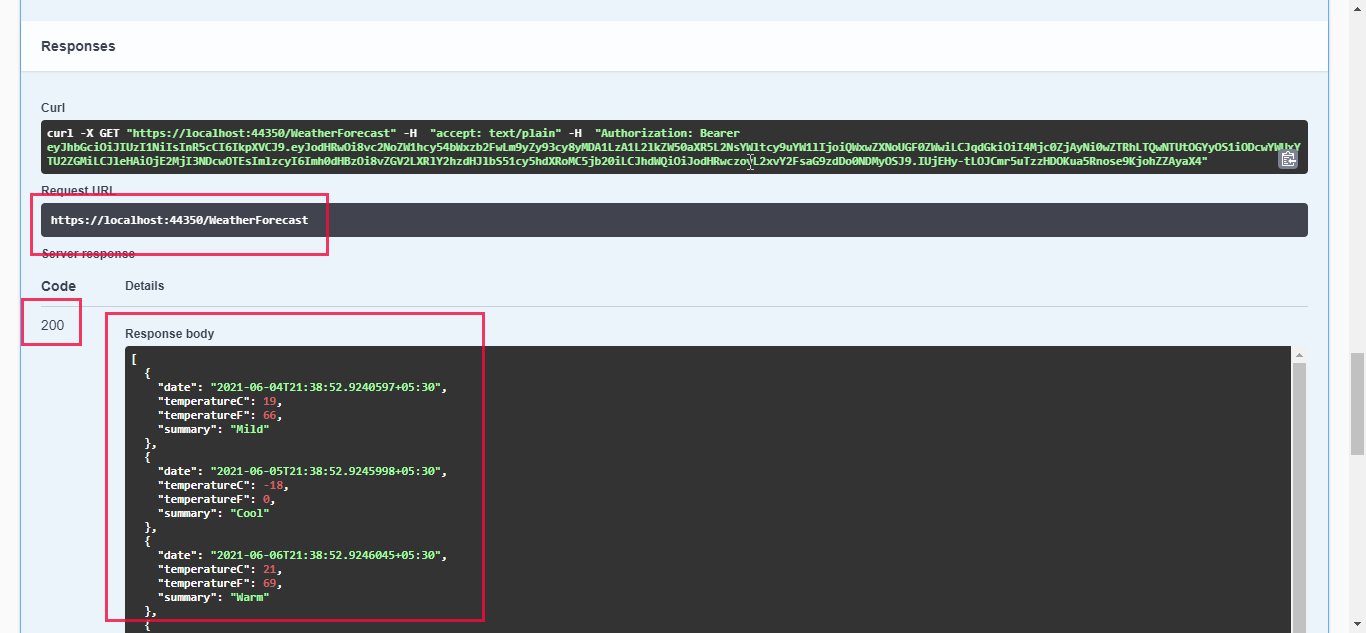
We can pass above token value as a bearer token inside the authorization tab and call get method of weatherforecast controller again.

Now you can see, you are authorized and you can access all controller and method which are Authorize.
Thank you for reading, please let me know your questions, thoughts, or feedback in the comments section. I appreciate your feedback and encouragement.
Keep Learning…. !!!
Login and Registration Form in Asp Net With Database
Source: https://medium.com/c-sharp-progarmming/asp-net-core-5-jwt-authentication-tutorial-with-example-api-aa59e80d02da